Tale Spin Walkthrought
TaleSpin on the NES — the one where every flick of the prop sets your route. From here it’s all about the clear: where to fly, when to flip the Sea Duck, what to grab in the shop, and how to bust bosses. No fluff — straight, level-by-level pointers and little tricks that save lives and sanity.
Route and shop: what to buy and where to start
On the world map, pick a calm opener — the jungle. It’s the most “honest” stage and a safe way to bank cash while practicing your flip. After the first run, swing by Wildcat’s shop: speed and fire-rate upgrades make the next legs much easier. Priorities: engine boost (for cave handling), rate of fire, and the size-reduction mod — a smaller Sea Duck forgives stray pixels. Pick up an extra life once your wallet’s steady. Those spare attempts pay off at the pirate base.
The loop for the whole game is simple: run — loot — upgrade — next run. A comfy order for TaleSpin: Jungle → Desert/Canyons → Northern Ice or the Sea stretch → Don Karnage’s final fortress. This route smooths out surprise difficulty spikes and lets you buy key upgrades without rushing.
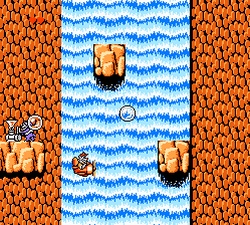
Jungle: learn the flip and stack cash
From the first screens, watch for red and yellow cargo balloons: pop the balloon, scoop the crate — straight cash for the shop. In tight spots and near waterfalls, cruise mid-height: the bottom edge is nasty — rocks and stumps can clip you. Your first must-do trick is a flip to scroll the screen backward. When you see a dead-end cliff with a narrow niche just past it, flip and pull the screen the other way — there’s a pocket with a heart or cash. Backfire is king here: small chasers love to tail you.
Learn the obstacle rhythm: double vines — pause — single branch — then a safe pocket above the water. Hearts often float there. Don’t rush every pickup: some crates sink in the river — grab the ones that drop onto flat ground or wide ledges. On the miniboss, sit diagonally bottom-left of his fire, clear the adds, and never park on one line longer than a second — his shots lead your position.
Desert and Canyons: narrow squeezes, whirlwinds, and safe lanes
In the sand, your real enemy is geometry. Stone “gates” in the canyons pass cleanly at mid-screen height. In sections with twitchy dust devils, don’t fight the wind: stay center and tap your height in short presses, don’t hold. Before long tunnels with fossilized stalactites there’s always a blank “breather” screen — use it to flip and sweep your six; fast pests love to spawn behind you.
There’s a cheeky double-corridor: the upper route looks wider, but the lower is safer thanks to fewer jutting ledges. Your landmark is a short stone “nose” on the ceiling before the split. Take the low path and hug the right wall. In one “well” you’ll spot two balloons almost touching: pop the top one first — the bottom will otherwise drop into the pit. The boss folds to the usual discipline of “two bursts — half-step aside”: he fires in volleys and leaves fixed windows. Don’t waste bombs if you’ve saved them — they’re better at sea.
Ice and Sea: slippery hitboxes and snap maneuvers
The northern map greets you with slow but spiteful floes. The ice doesn’t shake the screen — it bends enemy paths, and their shots arc. Hold roughly the top third of the screen: you’ll clear low spikes and still duck under high growths. In the ice caves, flipping is mandatory — there’s a fake “exit” that lures you down, and the real path opens only when you move back. A money stash hides behind an icy curtain of three stalactites in a row: between the second and third is a thin pocket — drift in at low speed, then flip and slip out the same way.
The sea stretch is prime for farming. Cargo balloons hang higher than usual, so clear the upper lane first, then pop them. In the wave section with three crests, the second is your safe “table.” Use that straight to grab a heart and a clock (if your version has it) before you surface to the miniboss. Fight him from underneath: sit under the lower edge of the cabin, fire on the diagonal, and when he turns — flip and rake his back. This is where TaleSpin’s signature flip-and-backfire loop shines — switch direction to dump volleys into empty space, then slide right back into the attack.
Pirate Base: space economy and clean damage windows
Before the final sortie, hit the shop again: if you can afford the size shrink, buy it on sight. The base is full of tight frames and jutting beams; a smaller Sea Duck slips where the regular one scrapes a wing. For the first third, ride mid-high and pre-clear the top — gun lifts keep popping from below. In turret corridors on the left, lock this rule: clean your rear corner first, then the nose. Flip — shoot — half-step forward — flip again. That way turrets can’t cross you.
Right before the main hall comes a string of fake dead ends: three times stone shields wall off the screen, and the path bends back and down. Memorize the beat: shield — flip — short horizontal — drop — flip again. One pocket holds a 1UP — if you’ve flown clean, take it; if you’ve been trading lives, skip it — the risk hardly pays back. On the approach to the boss, the last money bag hangs high right, but it’s only safe after you clear a pair of fast pirates — otherwise they’ll clip you on the arc.
Final Boss: phase it out and never glue yourself to a line
Don Karnage has two core phases. First he hides behind a rank of adds, and the real damage goes into the core block in the center. Sit at a 45° angle to the core, tap short bursts, and as soon as the rhythm shifts — flip, slide half a length, and meet the tail-chasers. Don’t hold one horizontal for more than a second: he ties volleys to your height. When the shield shatters, the fan spreads begin. Now save screen space: work at the very edge, where bullets are already stretched, and use the flip to spill the fan into dead air. Keeping the plane small nearly doubles your error margin.
If you’re stuck with the base shot, don’t sweat it: the damage window is short but consistent — two bursts, step, flip, one burst, step, back to two. With the ROF upgrade the phase melts quicker, but don’t speed yourself up — a steady carousel wins the finale. No jousting — only diagonals and back passes. That’s how TaleSpin on NES wraps without bleeding lives, with the pirate zeppelin burning behind you.
That’s the run for the initiated: route, flips, money spots, and clean boss windows. The rest is reps. Once your hands memorize the flip and the six-clean, Disney’s TaleSpin on NES flies steady, and the sea’s secrets plus farm cash line you up for every upgrade you need.